
Welcome! This is the third entry in a series where I explore MVVM frameworks that can be used with Xamarin.Forms. As a by-product of my investigation, I’ll have a handy bootstrapped project of each framework to help you get started using the framework discussed!
tl;dr – source code
Over the course of the series, I’ll be examining the pros and cons of the following MVVM Frameworks:
- MVVM Light (source)
- Prism.Forms (source)
- ReactiveUI + Xamvvm (source) <– This post!
Call me biased, but I saved the best for my last(?) entry in this series about MVVM frameworks for Xamarin.Forms. ReactiveUI is a very powerful tool for building robust, fault resistant applications in a easy to understand, declarative manner. The learning curve is steep, but the dividends are definitely worth the effort – and I still consider myself an amateur! Not familiar with ReactiveUI? Take a look at this superb introductory video by Kent Boogaart, who also wrote a fabulous book on using ReactiveUI for any sort of development or check out the documentation to get started – I won’t have time to call out all the ReactiveUI goodies in this post, but I’ll highlight things that are important to our discussion 👨🏻🎓
So how, does Xamvvm come in to play? Since ReactiveUI enables us to employ the MVVM pattern already, its is technically unnecessary, but I like using Xamvvm in conjunction with ReactiveUI because it makes a lot of common tasks easier. Namely, it abstracts away any of the “routing” business that is the default behavior in ReactiveUI, which I find cumbersome compared to other MVVM frameworks, such as Prism. I’ll be sure to highlight what features are available via Xamvvm as we go along as well, which can be used on its own if ReactiveUI isn’t your cup of joe.
Getting Started
As usual, we’ll need to get some NuGet packages to begin development. For now, let’s focus on two important packages:
Install-Package Xamvvm.Forms.RxUI -Version 1.0.5
Take note that we are specifically asking for the ReactiveUI version of Xamvvm – As mentioned above, you could use Xamvvm.Forms on it’s own, and the navigation patterns and conventions vary slightly depending on which route you choose. For the purposes of this post, however, we assume all things will employ ReactiveUI.
Note: Installing the necessary NuGet Packages for Xamvvm directly from the package manager prior to version 1.0.5 seems to result in conflicting references for netstandard2.0 projects. As a workaround, you can manually add all the dependencies at the top level by modifying your csproj file by hand, rather than relying on auto-resolution. Take a look at this gist as a reference.
However, if you use the latest and greatest you shouldn’t run into any problems; Xamvvm author Daniel Luberda recently published an update fixing this issue. Thanks Daniel!
Once we have all of the necessary dependencies sorted out, we can start diving in to MVVM. If you’ve followed along with my previous posts, the folder structure we want to set up should be familiar by now:
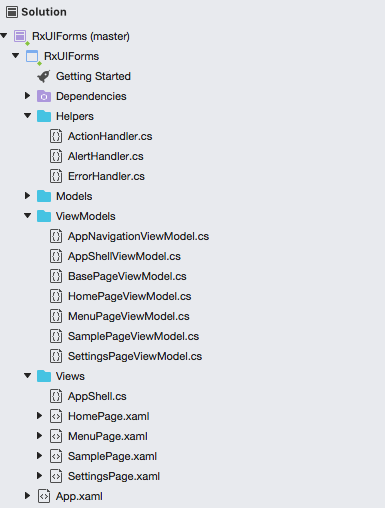
For the sake of consistency, we will try to keep the structure and content as similar to the previous entry in this series as possible. As with the MvvmLight demonstration, let’s delete the default HomePage.xaml and create a new one within our Views folder, as well as a few other pages and a new Helpers folder, which contains some interesting classes we will discuss later.
Xamvvm Factory
Unlike with our Prism example, we don’t need to modify the base class of our App.xaml, so let’s turn our attention to setting up our App.xaml.cs to render our first page. Take a look:
This file contains bidirectional Unicode text that may be interpreted or compiled differently than what appears below. To review, open the file in an editor that reveals hidden Unicode characters.
Learn more about bidirectional Unicode characters
| using System; | |
| using RxUIForms.ViewModels; | |
| using Xamarin.Forms; | |
| using Xamarin.Forms.Xaml; | |
| using Xamvvm; | |
| [assembly: XamlCompilation(XamlCompilationOptions.Compile)] | |
| namespace RxUIForms | |
| { | |
| public partial class App : Application | |
| { | |
| public App() | |
| { | |
| InitializeComponent(); | |
| var factory = new XamvvmFormsRxUIFactory(this); | |
| XamvvmCore.SetCurrentFactory(factory); | |
| MainPage = this.GetPageFromCache<AppShellViewModel>() as Page; | |
| } | |
| /* Omitted */ | |
| } | |
| } |
Here, we set up our factory, which will resolve our Views based on the provided View Model. In order to make this association, we need to make sure each View knows about its backing ViewModel. This isn’t quite as clean as Prism, which can infer the relationship by convention (assuming View and ViewModel follow a specific naming pattern), but it does give us the advantage that we don’t need to register each ViewModel individually for navigation in a global registration method – we can simply create the association as we build out new pages directly in the code behind.
AppShell
As an example of this, let’s start by stetting up our AppShell view and backing ViewModel:
This file contains bidirectional Unicode text that may be interpreted or compiled differently than what appears below. To review, open the file in an editor that reveals hidden Unicode characters.
Learn more about bidirectional Unicode characters
| using System; | |
| using ReactiveUI; | |
| using RxUIForms.ViewModels; | |
| using Xamarin.Forms; | |
| using Xamvvm; | |
| namespace RxUIForms.Views | |
| { | |
| public class AppShell : MasterDetailPage, IBasePageRxUI<AppShellViewModel> | |
| { | |
| public AppShell() | |
| { | |
| Master = this.GetPageFromCache<MenuPageViewModel>() as Page; | |
| Detail = new NavigationPage(this.GetPageFromCache<HomePageViewModel>() as Page) | |
| { | |
| BarTextColor = Color.White, | |
| BarBackgroundColor = Color.FromHex("#394A76"), | |
| Title = "Home Page" | |
| }; | |
| } | |
| public AppShellViewModel ViewModel { get; set; } | |
| object IViewFor.ViewModel { get; set; } | |
| } | |
| } |
Here we can see the Xamvvm Factory at work: our MasterDetailPage inherits from IBasePageRxUI, to which we pass the type of ViewModel we want to resolve to. While I generally follow well-formed naming conventions for readability, there is no requirement to follow any explicit pattern – in fact, the ViewModel could be names something entirely different! To make Xamvvm happy, we need to implement two properties that describe the ViewModel and IViewFor for this page, which just need to have publicly available getters and setters each. We now turn to the ViewModel:
This file contains bidirectional Unicode text that may be interpreted or compiled differently than what appears below. To review, open the file in an editor that reveals hidden Unicode characters.
Learn more about bidirectional Unicode characters
| using System; | |
| using Xamarin.Forms; | |
| using Xamvvm; | |
| namespace RxUIForms.ViewModels | |
| { | |
| public class AppShellViewModel : BasePageModelRxUI | |
| { | |
| /// <summary> | |
| /// Sets the detail page of the Master/Detail View | |
| /// </summary> | |
| /// <param name="page">Page.</param> | |
| /// <typeparam name="TPageModel">The 1st type parameter.</typeparam> | |
| public void SetDetail<TPageModel>(IBasePage<TPageModel> page) where TPageModel : class, IBasePageModel | |
| { | |
| var masterDetailPage = this.GetCurrentPage() as MasterDetailPage; | |
| // If we have set a custom Navbar color in AppShell.cs, we need to preserve it | |
| masterDetailPage.Detail = new NavigationPage(page as Page) | |
| { | |
| BarBackgroundColor = Color.FromHex("#87A3BA"), | |
| BarTextColor = Color.White | |
| }; | |
| masterDetailPage.IsPresented = false; | |
| } | |
| } | |
| } |
Notice that there isn’t anything interesting happening here, besides some housekeeping around the master/detail view and that we inherit from BasePageModelRxUI – this is key so that our View can properly resolve this ViewModel when called upon. From here on, we will start observing more ReactiveUI involvement and how it interacts with Xamvvm.
Commanding
From the perspective of the View, commanding in ReactiveUI is nearly identical to our previous examples in the series. In fact, beyond the initial establishment of data context, you can essentially copy/paste the previous example directly into this new project file, just as we did for Prism:
This file contains bidirectional Unicode text that may be interpreted or compiled differently than what appears below. To review, open the file in an editor that reveals hidden Unicode characters.
Learn more about bidirectional Unicode characters
| <?xml version="1.0" encoding="UTF-8"?> | |
| <ContentPage xmlns="http://xamarin.com/schemas/2014/forms" xmlns:x="http://schemas.microsoft.com/winfx/2009/xaml" x:Class="RxUIForms.Views.HomePage" Title="{Binding Title}"> | |
| <ContentPage.Content> | |
| <StackLayout Padding="10,20"> | |
| <ListView SelectedItem="{Binding SelectedItem, Mode=TwoWay}" ItemsSource="{Binding CopyItems}"> | |
| <ListView.ItemTemplate> | |
| <DataTemplate> | |
| <TextCell Text="{Binding Title}" /> | |
| </DataTemplate> | |
| </ListView.ItemTemplate> | |
| </ListView> | |
| <Button Text="Show Error Dialog" Command="{Binding ShowAlertCommand}" /> | |
| <Button Text="Show Action Sheet" Command="{Binding ShowActionSheetCommand}" /> | |
| </StackLayout> | |
| </ContentPage.Content> | |
| </ContentPage> |
Things get slightly more interesting when we turn to the ViewModel, but still closely resembles our previous examples, just with a ReactiveUI twist
This file contains bidirectional Unicode text that may be interpreted or compiled differently than what appears below. To review, open the file in an editor that reveals hidden Unicode characters.
Learn more about bidirectional Unicode characters
| /* | |
| * Define Commands | |
| */ | |
| public ReactiveCommand ShowActionSheetCommand { get; } | |
| public ReactiveCommand ShowAlertCommand { get; } | |
| public ReactiveCommand<CopyItem, bool> SelectItemCommand { get; } | |
| /* Omitted */ | |
| ShowAlertCommand = ReactiveCommand.CreateFromTask(async (arg) => await ShowAlert()); | |
| ShowActionSheetCommand = ReactiveCommand.CreateFromTask(async (arg) => await ShowActionSheet()); | |
| SelectItemCommand = ReactiveCommand.CreateFromTask<CopyItem, bool>(async (arg) => await Navigate(arg)); |
Reactive commands come in two flavors. Generally, we must supply a Parameter Type (input) and a Result Type (output), but for simple commands, we need not specify those values. Once declared, we can then instantiate each command via Task or from an function of type IObservable. I prefer the former, but the documentation goes into detail on other methods of initializing a command. For the sake of simplicity, we’ll stick to CreateFromTask for the remainder of this post.
Showing Alerts & Dialogs


Presenting dialogs and alerts elements can be a little tricky in ReactiveUI, so I typically stand up some simple helpers to save me a little trouble and stay D.R.Y . Let’s take a look at one for showing Action Sheets: We have a few supporting models to make this run, but the most important is our static implementations of the different type of user interactions we expect. For now, let’s assume we won’t need anything besides Errors, Alerts, and Action Sheets
This file contains bidirectional Unicode text that may be interpreted or compiled differently than what appears below. To review, open the file in an editor that reveals hidden Unicode characters.
Learn more about bidirectional Unicode characters
| using System; | |
| using ReactiveUI; | |
| namespace RxUIForms.Models | |
| { | |
| public class Interactions | |
| { | |
| public static readonly Interaction<Exception, ErrorRecoveryOption> Errors = new Interaction<Exception, ErrorRecoveryOption>(); | |
| public static readonly Interaction<AlertArgs, bool> Alerts = new Interaction<AlertArgs, bool>(); | |
| public static readonly Interaction<ActionSheetArgs, string> Actions = new Interaction<ActionSheetArgs, string>(); | |
| } | |
| public enum AlertActionOptions | |
| { | |
| Ok, | |
| Cancel | |
| } | |
| public enum ErrorRecoveryOption | |
| { | |
| Retry, | |
| Abort | |
| } | |
| } |
Notice that we have three flavors of ReactiveUI’s Interaction construct, each taking an input parameter type and an output parameter type. Under normal circumstances, we’d need to register various user interaction handlers on a per page basis in the code behind for each view that might need them. However, we can instead create a static class that handles the common workloads for us, like so:
This file contains bidirectional Unicode text that may be interpreted or compiled differently than what appears below. To review, open the file in an editor that reveals hidden Unicode characters.
Learn more about bidirectional Unicode characters
| using System; | |
| using System.Reactive.Disposables; | |
| using RxUIForms.Models; | |
| using Xamarin.Forms; | |
| namespace RxUIForms.Helpers | |
| { | |
| public static class ActionHandler | |
| { | |
| /// <summary> | |
| /// Registers the action handler to show an Action Sheet user interaction | |
| /// </summary> | |
| /// <param name="page">Page.</param> | |
| /// <param name="disposable">Disposable.</param> | |
| public static void RegisterActionHandler(Page page, CompositeDisposable disposable) | |
| { | |
| Interactions.Actions.RegisterHandler(async (interaction) => | |
| { | |
| var sheet = interaction.Input; | |
| var result = await page.DisplayActionSheet(sheet.Title, sheet.Cancel, null, sheet.Options); | |
| interaction.SetOutput(result); | |
| }).DisposeWith(disposable); | |
| } | |
| /// <summary> | |
| /// Registers the action handler to show an Action Sheet user interaction with Destroy option | |
| /// </summary> | |
| /// <param name="page">Page.</param> | |
| /// <param name="destroy">Destroy.</param> | |
| /// <param name="disposable">Disposable.</param> | |
| public static void RegisterActionHandlerWithDestroy(Page page, string destroy, CompositeDisposable disposable) | |
| { | |
| Interactions.Actions.RegisterHandler(async (interaction) => | |
| { | |
| var sheet = interaction.Input; | |
| var result = await page.DisplayActionSheet(sheet.Title, sheet.Cancel, destroy, sheet.Options); | |
| interaction.SetOutput(result); | |
| }).DisposeWith(disposable); | |
| } | |
| } | |
| } |
Ok! With all that in place now, we can finally wire up our command to present an action sheet.
This file contains bidirectional Unicode text that may be interpreted or compiled differently than what appears below. To review, open the file in an editor that reveals hidden Unicode characters.
Learn more about bidirectional Unicode characters
| private async Task ShowActionSheet() | |
| { | |
| var response = await Interactions.Actions.Handle(new ActionSheetArgs("Actions", new string[] { "Action1", "Action2" })); | |
| // TODO: Like with the Error Dialog, we want to perform different actions based on the user selection | |
| switch (response) | |
| { | |
| case ("Action1"): | |
| case ("Action2"): | |
| default: | |
| var alert = await Interactions.Alerts.Handle(new AlertArgs("I did it!", $"Selected {response}")); | |
| break; | |
| } | |
| } |
Like in Prism, we can wait for the response on our user interaction and take appropriate action. This is definitely more work than relying on the IPageDialogService that was available to us in Prism.Forms, but ReactiveUI gives some other cool features we can exercise to make life easier. Take for example, error handling. Using ReactiveUI, we can compose all the things that might fail, and handle them similarly (if applicable – special cases should be split out accordingly)
This file contains bidirectional Unicode text that may be interpreted or compiled differently than what appears below. To review, open the file in an editor that reveals hidden Unicode characters.
Learn more about bidirectional Unicode characters
| using System; | |
| using System.Collections.ObjectModel; | |
| using System.Diagnostics; | |
| using System.Reactive; | |
| using System.Reactive.Disposables; | |
| using System.Reactive.Linq; | |
| using System.Threading.Tasks; | |
| using ReactiveUI; | |
| using RxUIForms.Models; | |
| using Xamvvm; | |
| namespace RxUIForms.ViewModels | |
| { | |
| /* Omitted */ | |
| public class HomePageViewModel : BasePageViewModel | |
| { | |
| private async Task ShowAlert() | |
| { | |
| // Natrually, this is silly, but it demonstrates how to use Merged Observables to | |
| // handle errors elegantly. | |
| try | |
| { | |
| throw new NotImplementedException("This is a fake error to demonstrate the alert"); | |
| } | |
| catch(Exception ex) | |
| { | |
| await Observable.Throw<Unit>(ex); | |
| } | |
| } | |
| /* Omitted */ | |
| private void Initialize() | |
| { | |
| // Error Handling | |
| Observable.Merge(this.ThrownExceptions, SelectItemCommand.ThrownExceptions, ShowAlertCommand.ThrownExceptions, ShowActionSheetCommand.ThrownExceptions) | |
| .Throttle(TimeSpan.FromMilliseconds(250), RxApp.MainThreadScheduler) | |
| .Do((obj) => Debug.WriteLine($"[{obj.Source}] Error = {obj}")) | |
| .Subscribe(async ex => | |
| { | |
| var response = await Interactions.Errors.Handle(ex); | |
| if (response == ErrorRecoveryOption.Retry) | |
| { | |
| // TODO: If response is true, the user wants to "retry" the action. | |
| // Do something here to attempt the action again | |
| } | |
| else | |
| { | |
| // TODO: If response is false, the user has canceled the attempted action | |
| // So perform an action here that makes sense; we may want to naviagte to | |
| // a previous page or just sit idle | |
| } | |
| }).DisposeWith(SubscriptionDisposables); | |
| } | |
| } | |
| } |
In this contrived example, we purposely trigger an error, then handle it accordingly in our ReactiveUI subscriptions we establish in the Initialize method. There’s a lot more going on with Observables that I’m glossing over here, but that’s a topic for another post 🤔
Navigating
As mentioned earlier, I find navigating in vanilla ReactiveUI to be a bit cumbersome. Instead, by employing Xamvvm, things get much simpler. Take a look at the following example:
Notice how we PushPageAsNewInstance and then set some variables directly on the view model. With Xamvvm, when we push a page as a new instance, we are guaranteed to have a fresh instance of the ViewModel each time. We could also PushPageFromCache, in which the Xamvvm Factory will attempt to push a cached version – that is, one that is already constructed and (potentially) in a manipulated state – which can be useful when presenting data that changes infrequently (or not at all), or when allowing the user to “save progress” when going back a page, which could be desirable in registration flows and the like.

Xamvvm also exposes a handful of interfaces that make observing page state a cinch. These Navigation Interceptions can be used individually or as groups to track the states you’re interested in. By added them to our ViewModel, we can get similar functionality to what we had in Prism.Forms:
Conclusion
We did it! That concludes our tour of ReactiveUI and Xamvvm in Xamarin.Forms. If you’re still craving Reactive goodies, the GitHub repo has an exhaustive sample for ReactiveUI (sans Xamvvm) specifically for Xamarin.Forms, and the handbook is a great resource. For the example used in this post, feel free to browse the complete source code, or leave a comment if you have questions! I’ll be publishing another post covering ReactiveUI in depth later on, so stay tuned

Great workflows. Thanks
With your gained expertice i mvvm Frameworks could you say if its possible to combine prism with reactiveui?
LikeLike
I haven’t tried it myself, but it sounds doable – there would be some overlap (DelegateCommand vs ReactiveCommand), but can’t think of any direct conflicts. Let me try to whip up a sample and I’ll post a link 🙂
LikeLike
Hi! Xamvvm author here. In 1.0.5 package versions conflicts are resolved, so you can skip that step 🙂 Cheers
LikeLike
Awesome! Just verified and updated my post accordingly – thanks Daniel!
LikeLike
Neat! 🙂 Keep up the good work! Thanks.
LikeLike
Great kudos to you for this awesome series!
LikeLike