
Push Notifications aren’t new – mobile apps have had them since 2009, almost as long as modern smart phones have been around! Since, push notifications have expanded to the “traditional” web, and even smart speaker apps. For web developers interested in the marketing and functional benefits of push notifications a la mobile apps, the family of browsers APIs often identified under the umbrella of “Progressive Web App” have been a boon, but with one BIG caveat; mobile Safari for iPhones did not support push notifications. That caveat loomed large, especially in markets like the United States where iOS has a commanding market share of consumer mobile devices until the release of iOS 16.1, which finally added push notification support.
Despite some drama in early 2024 in the EU following approval of the Digital Markets Act (DMA), Safari (and browsers more broadly) continue to add features that blur the line between a fully native mobile experience and a rich web experience. So, while PWA’s still come with a lot of caveats (see below), the space continues to be an enticing avenue to expand the traditional web experience on user devices. In this post, I’ll cover how to use Safari’s new-ish browser APIs to bring push notifications to a standard web application. I’ll break down the most critical steps here, or you can skip right to the answer by checking out my sample repository: https://github.com/JoeM-RP/serviceworker-safari
Adding the Service Worker
If you don’t already have a running web app, it’s super easy to make one using Nextjs. If you do already have a web app up and running, make note of your folder structure and compare to mine; you’ll likely need to make some adjustments to path values based on how your web app is organized. For the duration of this post, I’ll assume you also are using Nextjs, but the principles can be adjusted for a variety of contemporary frameworks.
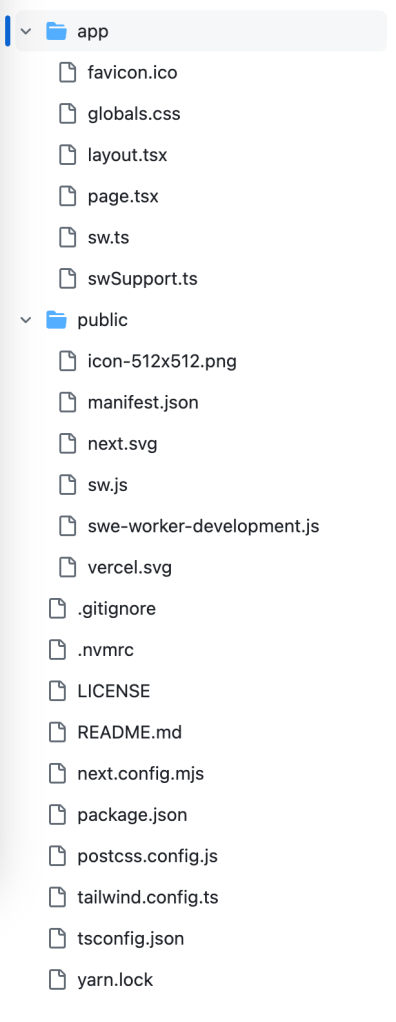
N.B the above image is the final structure – I’ll call out important files as they get added. To get started, run the following command from your project directory:
yarn add @serwist/sw @serwist/next
I’ve opted to expedite my service worker development by leveraging Serwist, which conveniently packages a bunch of service worker “stuff” in one handy npm package. That said, if you want a more hands-on approach, you can always make your own sw.js file and set up your service worker exactly to your liking following guides on MDN. After installing serwist, make sure the types are added to our tsconfig.json if you, too, are using typescript, like so:
    "types": [
      // Other types...
      // This allows Serwist to type `window.serwist`.
      "@serwist/next/typings"
    ],
Next, we’ll configure the behavior we expect of our Service Worker in a new file, app/sw.ts. This will be compiled into useful JavaScript by serwist automatically, but again, you could do this yourself using standard APIs if desired.
import { defaultCache } from "@serwist/next/browser";
import type { PrecacheEntry } from "@serwist/precaching";
import { installSerwist } from "@serwist/sw";

declare const self: ServiceWorkerGlobalScope & {
  // Change this attribute's name to your `injectionPoint`.
  // `injectionPoint` is an InjectManifest option.
  // See https://serwist.pages.dev/docs/build/inject-manifest/configuring
  __SW_MANIFEST: (PrecacheEntry | string)[] | undefined;
};

installSerwist({
  precacheEntries: self.__SW_MANIFEST,
  skipWaiting: true,
  clientsClaim: true,
  navigationPreload: true,
  runtimeCaching: defaultCache,
});
Before this code gets compiled though, we’ll need to tell Next about it, which can be done in next.config.mjs.
import withSerwistInit from "@serwist/next";

const withSerwist = withSerwistInit({
    swSrc: "app/sw.ts",
    swDest: "public/sw.js",
    register: false,
    cacheOnFrontEndNav: true,
});

export default withSerwist({
    // Your Next.js config
    env: {
        // Client env variables go here
    },
});
N.B – if you used the default options for create-next-app@latest your sw.ts file may be at src/app/sw.ts. At this point, running next dev should compile sw.ts (our swSrc) into a service worker file, sw.js in the public folder (our swDest). To fully enable the power of the service worker, we need a few more items, specifically a manifest. Make a new file at public/manifest.json with the following contents
{
"id": "/",
"theme_color": "#000",
"background_color": "#f8fafc",
"display": "standalone",
"scope": "/",
"start_url": "/",
"name": "Progressive Web App Safari",
"short_name": "PWA Safari",
"description": "An app demonstrating PWA features in Safari",
"icons": [
      {
        "src": "/icon-512x512.png",
        "sizes": "512x512",
        "type": "image/png",
        "purpose": "any maskable"
      }
  ]
}
IMPORTANT: to properly register your service worker and signify it as “installable” to browsers, you’ll need to include at least one valid file in the
iconsarray. I’ve provided one here that, admittedly, looks like a parking sign. For more info on favicons and, I recommend this great blog post by evilmartians.
To correctly propagate the manifest, we’ll add it to the <head> of our html, whcih can easily be achieved in next by modifying layout.tsx at the root of the app.
const APP_NAME = "PWA App";
const APP_DEFAULT_TITLE = "Safari PWA App";
const APP_TITLE_TEMPLATE = "%s - PWA App";
const APP_DESCRIPTION = "PWA app featuring APIs newly added in Safari";

export const metadata: Metadata = {
  applicationName: APP_NAME,
  title: {
    default: APP_DEFAULT_TITLE,
    template: APP_TITLE_TEMPLATE,
  },
  description: APP_DESCRIPTION,
  manifest: "/manifest.json",
  [...]
}
If you’re not using nextjs, you can add a link to the manifest in your project with a link tag, like so:
<link rel="manifest" href="manifest.json" />
For more information on manifests and available configuration properties, you can find the documentation here on MDN.
Finally, we’re ready to register our service worker with the web app. Once registered, supported browsers can prompt visitors to install the app and we’ll be able to make use of all the apis available to service workers. On page.tsx, we’ll add a use client indicator to the top of the file (for newer versions of nextjs) and the following block within a useEffect hook:
      window.serwist.register()
        .then((result: any) => setRegistration(result))
        .catch((err: any) => alert(err)).catch((err: Error) => console.warn(err))
Again, this could be handled with plain JavaScript/typescript calls, but we can rely on serwist to get us out instance of service worker at any point during code execution. Before we validate our features on Safari for iOS, we want to check some things in a desktop browser of your choosing. I’m using Chromium-based Edge, but Google Chrome, and Firefox are also good choices thanks to their robust developer tooling. Safari for desktop could work (and indeed, we’ll want to test there too when we test for Safari mobile!) but I find their tooling is not quite as robust. Your mileage may vary.
Restart your dev server and launch the URL (in my case, localhost:3009) in your testing browser and open the dev inspector. Here are some tells that indicate our service worker is ready to work:
- From dev tools, open the “Application Tab” and select Service Worker from the sidebar. You should see information regarding your service worker

- Likewise, selecting “Manifest” from the sidebar within the Application Tab should so some diagnostic info about the content we added to
manifest.json, as well as some suggestions/warnings:
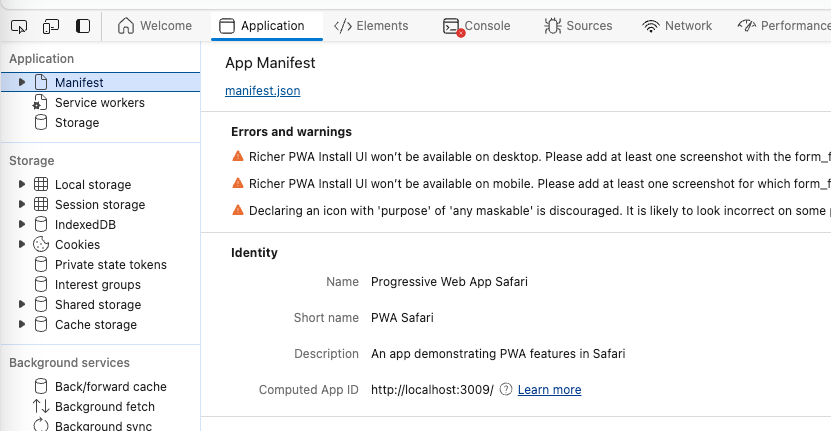
- You may also see the message “App Available” in the navigation bar, accompanied by an icon, like so:

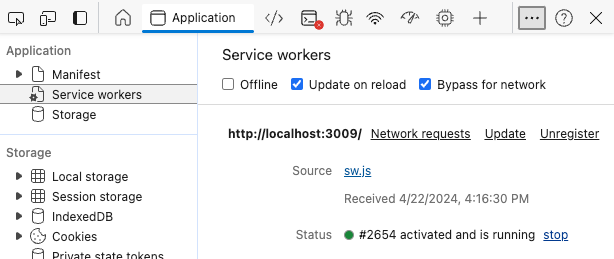
If all that is present, we’re ready to start developing for push notifications. Take this opportunity to ensure the following configurations are selected within the Service Worker section under the Applications Tab, which will ensure for a seamless developer experience.

N.B – that by default the service worker will intercept any calls our web app is making to the local server and respond according to the behavior outlined in sw.ts. Since we have instructed our service worker to cache requests on navigation, checking both “Update on reload” and “Bypass for network” within the Applications Tab of our dev tools ensures we will always get the latest and greatest from our locally running developer server. If you notice updates and behaviors you have definitely changed in code that aren’t reflected on the locally running instance, verify these options are enabled to ensure your service worker isn’t doing its job too well. As a last resort, you can also “unregister” the service worker from the same tab, which will then get re-registered on reload as well as pulling the latest changes from your code base.
Sending a Local Push Notification
Before we can send a push notification, we have to ensure that the browser running our code support it. This handy block of code will help us check that the code is running someplace that allows for push notifications to be received:
export const isNotifySupported = () => {
    return typeof window !== 'undefined' && "serviceWorker" in navigator && "Notification" in window && "PushManager" in window;
}
In this block we check:
- That code is executing in a “window” environment (i.e- client side code; on nextjs, you may encounter build errors or runtime errors if we try to call service worker stuff from someplace that is not a valid client)
- That “navigator” in the browser has a service worker registered
- That the client “window” has the Notification API (Which is present in all contemporary browsers, but may be missing on older devices that do not support modern web browsers)
- That the client “PushManager” API is present in the client window (like above, this is necessary for our demo but may not be present on older browsers)
If all this is true, we know the browser is in a state to support push notifications. Bear in mind that this block of code returns true upon visiting the page for all modern desktop browsers and may be true when visiting the page via Chrome for Android, but will only be true on iOS Safari after the web app has been added to the device home screen (more on that in a bit).
So, let’s get to sending a push notification. There are two categories of push notifications; local push notifications, which are managed and (typically) scheduled by the running client app and remote notifications, which require a running client to register with a remote server to receive. The latter case is much simpler, so we’ll start with that example.
Make a new function with the following logic to construct a local push. In my example, I bound this function to a button click, but this logic follows for any event you may want to tie a push to:
      const options = {
        body: `New message from ${result.name.first} ${result.name.last}`,
        title: `PWA Safari - ${count + 1}`,
        icon: result.picture.thumbnail,
        actions: [
          {
            action: "open",
            title: "Open the app",
          }
        ]
      };

      // You must use the service worker notification to show the notification
      // e.g - new Notification(notifTitle, options) does not work on iOS
      // despite working on other platforms
      await registration.showNotification("PWa Safari", options);

      // Set the badge count
      setCount(count + 1)
Important to note here that while many browsers support new Notification() syntax, Safari explicitly does not! You must call the instance of the registered service worker and use the showNotification() function to display your local Push. This syntax, fortunately, IS supported by all the major players. You can view the compatibility list for specific versions here.
await registration.showNotification("PWa Safari", options);
Before we can actually send a local notification, we need to ask for the users permission. We can do that with a call to the Notification web API, which may look something like this:
Notification.requestPermission().then(async (result) => {
          if (result === "granted") {
            setIsPushGranted(true);
            [...]
            // do more stuff if needed
           }
}
Once that block is called, refreshing your browser should yield an alert like the following
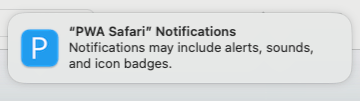
Much like for iOS, you may not see this request (or get a “denied” error) in desktop Safari if the web app hasn’t been added to your dock. On other browsers, you may get a popup message naturally or need to explicitly allow push notifications from the navigation bar (which can happen if a certain URL frequently is asking for a permission) but without the need to “install” the PWA:

Once our permissions are squared away, we can test a send which should look like so:

Notice that the notification may look different browser-top-browser. In the top example, them Chromium browser shows an included image attachment that we included in our push notification config, while in the bottom example from desktop Safari, we only see the app icon. Keep in mind that including more icon sizes in the app manifest can also yield more consistent results between browser’s such that the Chromium browser would show our icon in place of the browser’s own icon (in this case, Edge). If everything has worked up to this point, now is a good time to test on Safari for iOS, which you can do via a locally running simulator or physical device connected to the same network as your developer machine. Open the web app in Safari via localhost or the local IP of your dev server to see the results. As mentioned earlier, in the full Safari experience, you won’t be able to take advantage of all Service Workers have to offer. Frustratingly, Safari also won’t notify you that a service worker is available to install! In the real world, you may want to indicate to users on iOS Safari that the option is available and how to accomplish it to take full advantage of your sites features. Below is a short video showing the install process:

If everything has gone according to plan, you should now be able to send a push notification and observe the badge counter update on the home screen from the installed PWA. In this case, we’ve simulated the receipt of a message from a friend, but generally speaking local notification should be reserved for events and notices scheduled in advance, like reminders, timers, and alerts. This can be accomplished using the timestamp option. You can review the full list of available notification options on MDN.
Registering for Remote Push Notification
Okay! So, what if you want a web app to receive a notification sent ad-hoc via a remote server? Assuming you already have a service ready to send notifications to registered clients (which is an undertaking in and of itself!), we just need to modify some of the code above:
        Notification.requestPermission().then(async (result) => {
          if (result === "granted") {
            setIsPushGranted(true);

            // Permission state *should* match "granted" after above operation, but we check again
            // for safety. This is necessary if the subscription request is elsewhere in your flow
            const pm = await registration?.pushManager?.permissionState()
            if (pm === "granted")
              // https://developer.mozilla.org/en-US/docs/Web/API/PushManager
              // Requires HTTPS and a valid service worker to receive push notifications
              registration?.pushManager.subscribe({
                userVisibleOnly: true,
                applicationServerKey: "HELLOWORLD",
              }).then((subscription) => {
                console.log(subscription.endpoint);
                // The push subscription details needed by the application
                // server are now available, and can be sent to it using,
                // for example, the fetch() API.
              }, (err) => console.warn(err))
          } else {
            alert("We weren't allowed to send you notifications. Permission state is: " + result);
          }
In this exchange, the web app passes a server key to the push notification server and receives subscription details back. On the backend, the server needs to log the client as a valid recipient to distribute a push notification too. Easy, right? This effort is left as an exercise to the reader. 😉
PWAs and Caveats
So, with all that squared away, we’ve made a web app that is capable of receiving push notifications wherever the user may want them:
- Install process for iOS and desktop Safari remains clunky and unfamiliar to the average user
- Push notification appearance may vary browser-to-browser
- Supported features for push notifications may vary browser-to-browser
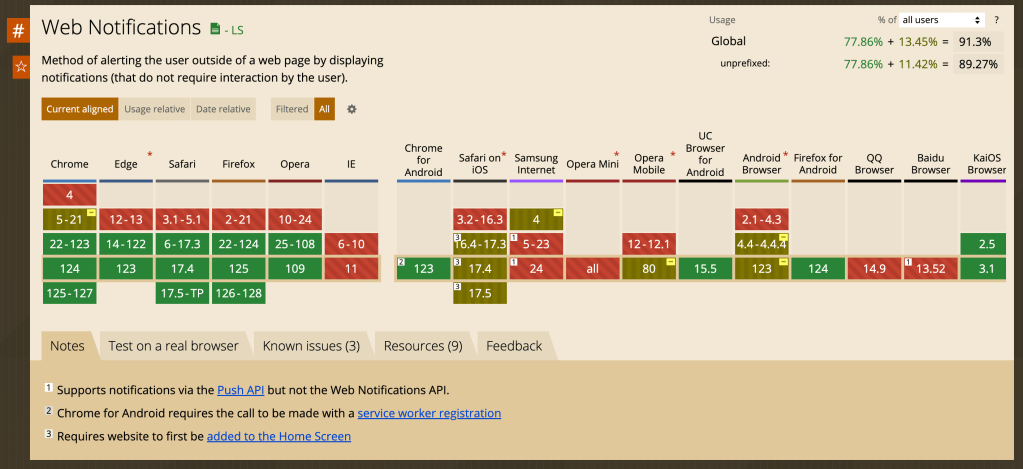
- Browsers with smaller market share may not support push notifications at all; as always, caniuse is a great resource for understanding the compatibility landscape
Keep this in mind when developing push notifications (or any other service worker or PWA feature) for your web apps and carefully consider the impact to users on devices that aren’t supported.
Cleanup
If you used a common (or default) port while developing your service worker, be sure to unregister it at that url to ensure it doesn’t interfere with development on other work. Open your developer tools in in the browser and navigate to the Application Tab. Under service worker, locate the register worker and tap on unregister to clean it up.
Likewise, you can unregister any installed service workers by visiting edge://apps/ or chrome://apps/ to see what web apps have been installed and delete.
Now your workspace is tidy and ready for the next project!

You must be logged in to post a comment.