
Welcome! This is the third entry in a five-part series in which I explore Visual Studio Mobile Center and how it can help simplify your development and testing of mobile apps. I’ll be covering the following topics in the series:
Note that, since Mobile Center is technically still in preview mode, the information relayed here is subject to change. As always, check the documentation for the latest and greatest and keep an eye on the roadmap for official options on Mobile Center.
In this post, let’s revisit that tantalizing build option we touched on briefly in Part 1:
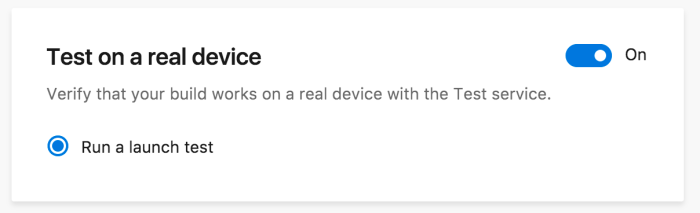
This feature simply launches the app on an arbitrary device and checks to see if the launch completes, then provides a screenshot. For those familiar with Xamarin.UITest, the actual code would look something like this:
        [Test]
        public void AppLaunches()
        {
            app.Screenshot("First screen.");
        }
Mobile Center takes care of a lot of setup behind the scenes, so pick your favorite branch configured for device builds and go ahead and toggle the test option. Note that your builds will take up to ten minutes longer with Test on a real device enabled, as the app must wait for a free device in the queue, load the app, and then execute the test. For those unfamiliar, Mobile Center is leveraging the Xamarin Test Cloud hardware library, which includes thousands of real devices running tests in some austere warehouse underground (that’s how I imagine it, at least).
Mindful of Billing
As an aside, it is important to note that Xamarin Test Cloud is a paid service. So, how is it we are using it for free? The short answer is that Mobile Center is still in preview and giving away goodies for free is a good incentive to get people to use the platform, which in turn helps gather metrics, determine future pricing, and (hopefully) farm loyal customers down the line. I strongly suspect that Mobile Center will not be free to use indefinitely, so keep that in mind as we explore the platform.
N.B – this is largely speculative on my part, but the pricing section of the Mobile Center documentation alludes to some proposed structures. Now, back to the fun stuff…
Once your build is re-run and completes, you should have new test results appearing under the appropriate section in the app dashboard.
As expected, we see the test ran on one device, passed, and we’ve captured a screenshot, some device information, and the logs if needed. With the easy part over, let’s turn to running more serious tests in Mobile Center
Device Sets
If you’re following along at home, my assumption is that your project also uses Xamarin.UITest and you’ve already got it set up with your specific code-base. Refer to the documentation if needed – there are some platform specifics here you should be aware of. If you are using my repository, setting up your test project should already be done for you, so let’s open up a terminal, and return our focus to the Mobile Center dashboard, where we’ll start our Test adventure by constructing a new Device Set – select the appropriate sub-menu on the left.
A Device Set is just that – a set of devices you want your test to run against. They can be old or new, tablets or phones, and can potentially run on a vast array of OS versions. Clicking the appropriate button to create a new set brings up a list of all the available devices:

Considering each image here represents a real device somewhere in the world, I find the variety (160 devices at the time of writing) incredible, even for the relatively homogenous iOS space. Likewise, Android has an equally commanding array (239 at the time of writing) of hardware to choose from. Clicking the filter in the search box allows us to narrow the results by device type (tablet or phone, though in practice this usually shows phones and not-phones), memory, CPU available, and tier. What does Tier entail? I have no idea, but it filters something and perhaps there are brighter minds out there who can enlighten me. Once we’ve settled on a device set, let’s turn our attention to the Test Runs menu.
Test Runs
We start here by creating a new test run and selecting the device set we just created. You can also select a smattering of random devices if you wish, but using a pre-defined device set is better for consistency; update the device set, and any test run relying at will reflect the changes in roster next time it is run.
Next, we’ll configure the test with some basic parameters; just a test series name and the framework we intend to use. The final screen will auto-fill a few parameters from this one, but you’re welcome to go back and change these values later if they no longer suit you. Copy the following block from this screen to your favorite editor and lets open a terminal window (or command prompt on Windows)
mobile-center test run uitest --app "I-Write-Code-Sometimes/Mobile-Center-Demo" --devices "I-Write-Code-Sometimes/contemporary-set" --app-path pathToFile.ipa --test-series "demo" --locale "en_US" --build-dir pathToUITestBuildDir
We’ll need to start by installing the mobile center cli from npm, like so:
npm install -g mobile-center-cli
Then, we’ll need to log-in to mobile center using the following command:
mobile-center login

For the authentication process to complete, the CLI tool will launch a browser window with a key value – copy the key value to your clipboard and supply it to the CLI to finish. Now that we are authenticated, we can execute the block we copied earlier to initialize our test run, with a few substitutions as prescribed:
- pathToFile.ipa – signifies the path to your app ipa. I haven’t found a super clean way of doing this, so I usually just download the latest build from mobile center and reference that. Conceivably, you could point this to your output directory, or wherever you app gets Archived for Publishing
- pathToUITestBuildDir – a little more tricky… what we actually need to supply here is the output directory for our UITest project – not the root directory.
You should end up with something like this:
mobile-center test run uitest --app "I-Write-Code-Sometimes/Mobile-Center-Demo" --devices "I-Write-Code-Sometimes/contemporary-set" --app-path /Users/jmeyer/Downloads/Mobile_Center.iOS.ipa --test-series "demo" --locale "en_US" --build-dir /Users/jmeyer/Projects/JoeM-RP/Mobile-Center-Demo.git/Mobile_Center.Test/bin/debug
And, once we copy that into our terminal, the test is prepared and begins execution.
This’ll take a bit, so feel free to go on a quick coffee run. Once back, we should see…

Yikes! Tough luck on my part. As before, we can inspect screenshots and logs to determine what went wrong. I’ll go back, update my code & tests (if necessary), and restart the Test Run from the Dashboard after checking in. (For the record, the app was waiting for user input to allow for Push Notifications)
With that, we conclude Part 3 of this series. Stay tuned for Part 4, where we’ll look at Push Notifications and In-App Updates using Mobile Center

You must be logged in to post a comment.