
Welcome! This is the fifth entry in a five-part series in which I explore Visual Studio Mobile Center and how it can help simplify your development and testing of mobile apps. I’ll be covering the following topics in the series:
- Build Automation & Distribution
- Crashes & Analytics
- Testing
- Distribution
- Push Notifications
Note that, since Mobile Center is technically still in preview mode, the information relayed here is subject to change. As always, check the documentation for the latest and greatest and keep an eye on the roadmap for official options on Mobile Center.
If you’d like to follow along at home without having to set up your own code-base, I already have a repository you can use to get started. You can find it here.
In this section, let’s look at some of the features available to us for testing push notifications in Mobile Center. Keep in mind, you’ll need to dive into the Apple Developer Portal, and/or Firebase for this to get the proper keys set up. Fortunately, Mobile Center provides platform-specific documentation for iOS and Android that walk you through the steps if you’re not already familiar with each platform.
If everything else is already set up, all we need to do to get started is to add the Push SDK and include the following line to our OnSart method in App.xaml.cs:
        protected override void OnStart()
        {
            // Handle when your app starts

            // Customize Distribute Message
            Distribute.ReleaseAvailable = OnReleaseAvailable;

            // Start Mobile Center
            MobileCenter.Start("ios=1f55e7a2-0958-4dc0-ba63-cd0cb9e62988;" +
                   "uwp=7740dc08-60a3-47f0-9eb2-c602815280ad;" +
                   "android=970c6dac-5e92-4fd7-bbd8-2017d2cb3709",
                               typeof(Analytics),
                               typeof(Crashes),
                               typeof(Distribute),
                               typeof(Push));

        }
Be sure to push these changes to your repository and download and install the latest version of your app once the build completes so that you can test notifications. You (and your testers) will be prompted to allow notifications the next time the app is opened.

Defining an Audience
While sometimes it makes sense to notify every user of an app, in many cases it is more reasonable to notify a small subset. For example, if we are starting a promotion that is only available in the United States, we don’t need to annoy our users in Denmark! Let’s take a look at defining an audience that we can specifically send notifications to using Mobile Center. From the dashboard, let’s navigate to the Push from the navigation pane and find the sub-section called “Audience” and start creating a new sub-group.

Here we can define as many parameters as we need to appropriately target a subset of users. In this case, I am specifying an specific OS version, but we could also filter by region, device size or model, or specific app versions. Keep in mind that you can only change the description and parameters after you save; if you decide you need to change the Audience name later, you’ll have to recreate the whole definition. Not that our “users” are defined by install IDs and not device IDs, so if distinguishing parameters change while the app i not installed on a particular device, our numbers will be skewed slightly.
Sending a Notification
Once we’ve defined an audience, let’s click over to the Notifications menu and define our first push notification. If you haven’t already, you’ll be prompted to provide Mobile Center with some information to help send notification; you’ll need a different set of keys and identifiers for each platform, so review the documentation for iOS and Android if you’re not familiar with the process.
Now we can define our first notification. The first step is to establish some basic parameters, such as a campaign name, title for the notification and body content. Note that users will only see the message and (optional) title, so feel free to use any name that is meaningful to the team. On this screen, we can also configure any custom data, which may help drive analytics or trigger “deep linking” when the user clicks the notification. For the sake of simplicity, we will only look at the default goodies for now.

Next, we define our target audience. Here, we can signify to whom we wish to send the notification to. By default, “All registered devices” is selected, but we can also choose the audience we created previously (or create a new audience to target and re-use in the future) or a custom device list (for example, only developers currently building/testing a feature). For now, the custom device list is limited to a maximum of 20 install IDs, but since you’ll need to add extra code to determine the device ID, that can be a difficult avenue to test by.
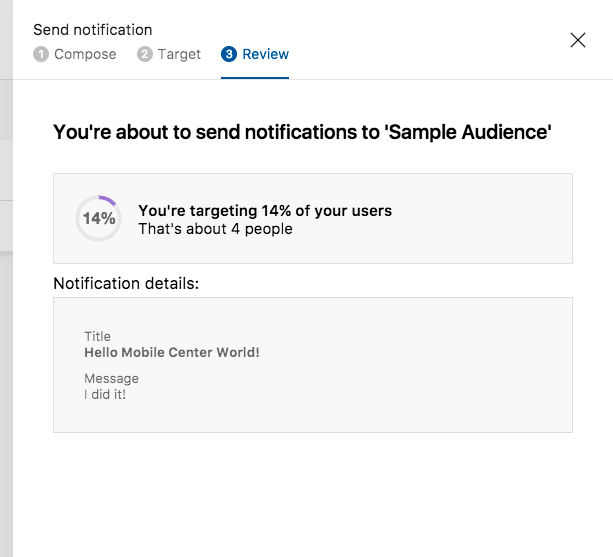
Finally, we can review the message before sending – last chance to make changes! Once we press send on this screen, Mobile Center will start publishing push notifications and we’ll have no way to “recall” a push notification with an embarrassing typo. Review the audience and message content carefully before proceeding.
Click Send and our message is away! Turn to any device with the latest version of our code installed, and we should shortly see a toast:

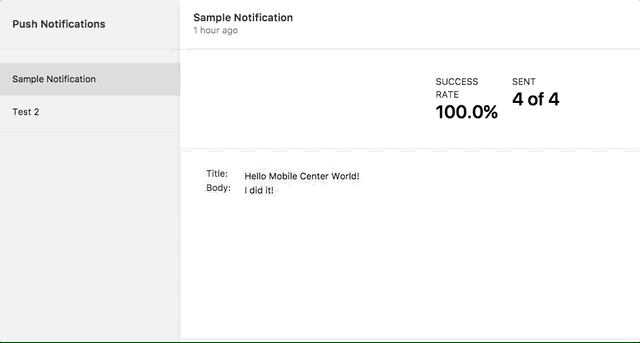
Returning to the landing page, we can review statistics for our app, including how many messages were sent and how many were received. If anything went wrong in transmission, that info will be surfaced here:
And that’ll do it for Push Notification in Mobile Center! If you have any questions about this feature or any of the other features we looked at in this series, feel free to leave a comment.

You must be logged in to post a comment.